The MultiMeter is the laboratory instrument of Sintéleia's ΔA Meter® family. It combines in a single device the functions of the DA Meter®, the Kiwi Meter and the Cherry Meter: by changing the measuring head, the same instrument works on climacteric fruit (apples, pears, peaches, plums, apricots), on kiwifruit, on cherries, or performs absorbance measurements at up to six wavelengths between the visible and the near infrared.
Like all the instruments of the family, the MultiMeter measures the ΔA Index®, that is the difference in absorbance between two wavelengths chosen around the chlorophyll absorption peak. Since the chlorophyll content of the flesh decreases as ripening proceeds, the ΔA Index® makes it possible to establish the ripeness of a fruit in a non-destructive way, independently of the weather of the season.
What changes compared with the handheld ΔA Meter®#
The measuring principle, the calibration, and the handling of averages, markers and labels are the same as on the handheld instruments. What changes is the way the instrument is powered and connected, and the possibility of replacing the head.
Handheld ΔA Meter®
MultiMeter
Use
In the field and in the warehouse
In the laboratory, on the bench
Power
3 AA alkaline batteries
External power supply 15–24 V DC (mains)
Sensor
Fixed, dedicated to one type of fruit
Interchangeable head, recognised automatically
Connections
USB (the instrument behaves like a USB stick); micro SD slot
Ethernet, USB port for a memory stick
Data memory
Micro SD Card
Internal memory; export to USB stick, FTP or web pages
The chapter General description presents the instrument and its connections, Installation and power supply explains how to put it into operation, Measuring heads describes the heads and how to change them. The chapters on use follow (first steps, calibration, measuring, menus), then those on the network connection and on data, and finally the technical specifications.
AC/DC mains power supply with cable (output 24 V DC, 1.66 A, 40 W);
white reference for calibration;
one measuring head: each instrument is supplied with one head, chosen according to the fruit to be measured (the other heads are purchased separately).
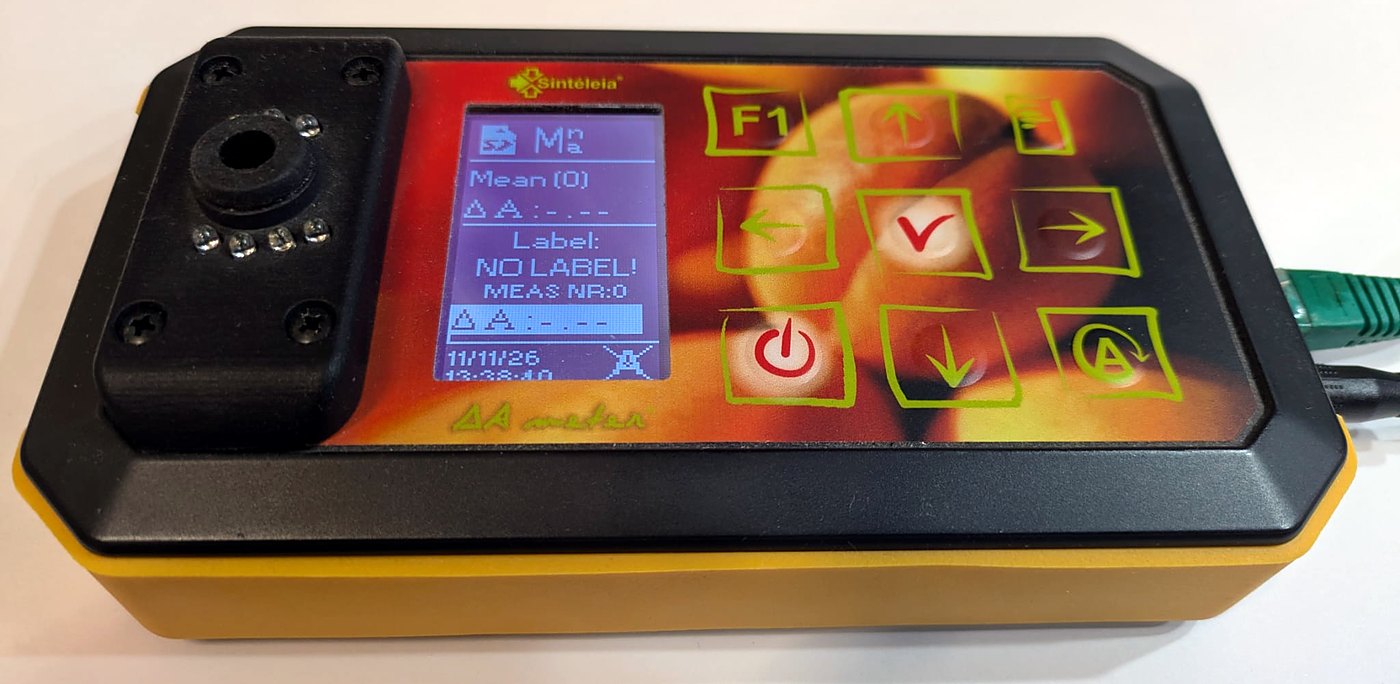
The MultiMeter is a bench instrument. On the top panel you find the backlit graphic display, the keypad and the on/off key. The measuring head is mounted on the top panel, at the top left. The other connections are all on one of the short sides of the instrument, in this order (from the left, looking at the instrument from the connection side):
power input (round connector for a 15 to 24 V DC power supply), with an LED showing that voltage is present;
Ethernet network socket (RJ45), with the link and activity LEDs;
USB port (type A) for the memory stick, with an LED showing access to the stick;
The connection side: power input, Ethernet socket and type A USB port. The LEDs of the network socket are visible.The MultiMeter: top panel with the measuring head, the display and the keypad.
The MultiMeter is designed for laboratory use. Place it on a stable surface, away from heat sources and direct sunlight: the sensor subtracts the ambient light from the measurement, but strong radiation on the head can still disturb it. It is not intended for measurements in the field: the handheld ΔA Meter® instruments are made for that.
Unlike the handheld instruments, the MultiMeter does not run on batteries but on an external DC power supply from 15 to 24 V. The instrument contains the regulators that produce the internal voltages; a series diode at the input protects it against accidental reversal of polarity.
Insert the power supply connector into the power input of the instrument.
Connect the power supply to the mains.
The power LED lights up. The instrument stays off until the ON/OFF key is pressed.
Switching on. Press the ON/OFF key for about one second, until the beep and the first messages on the display. The instrument prepares itself for operation and recognises the connected head. Before the measurement screen some warnings may appear (press a key to continue):
Date and time seem to be corrupted: date and time are not valid; set them in Menu → Config → Date & time.
Config data corrupted, Sample data corrupted, Net config data corrupted: the data saved in the instrument are not valid and have been reset to the default values; check the settings again.
Head changed; Mean cleared: a head different from the last time has been connected; the calibration has been cancelled and the mean cleared.
calibration data too much old or absentees: the calibration is missing or is not from today; perform CAL.
Last measuring block has not been terminated: with the Label function on, the previous block has not been closed; close it with END BLOCK or start a new one with SET MARKER.
Switching off. Press ON/OFF for about one second: the instrument closes the open files and switches off within a few seconds. If the instrument does not respond, hold down ON/OFF for about 15 seconds to force it to switch off. The MultiMeter does not have automatic switch-off for inactivity.
Date and time are kept, while the instrument is off, by a CR2032 lithium coin cell inside it. If the warning about invalid date and time appears at every switch-on, the battery is probably flat: contact the distributor or Sintéleia for its replacement.
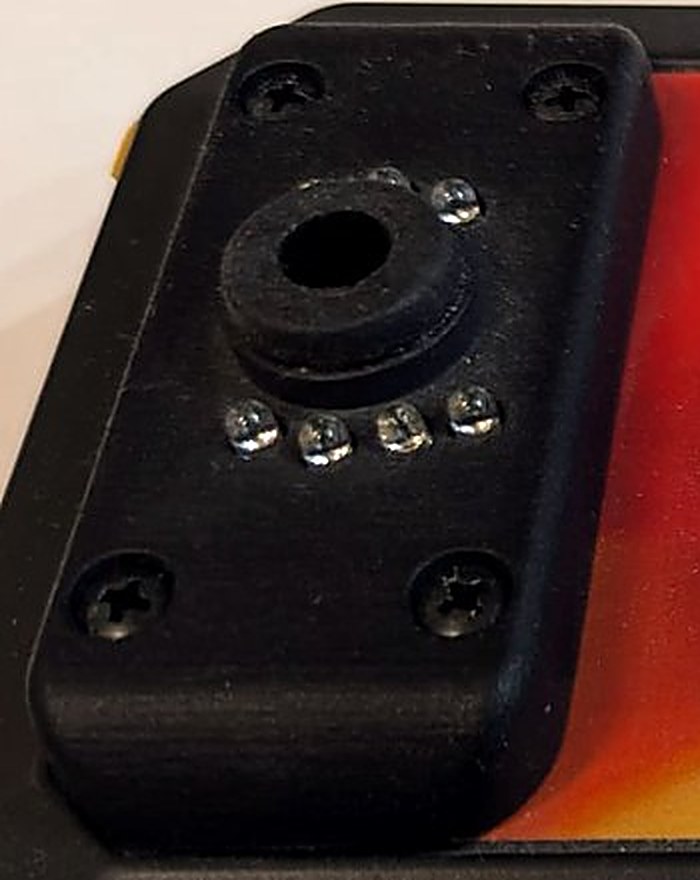
The head is the optical sensor of the MultiMeter: it contains the LEDs that illuminate the fruit (each at a different wavelength) and the photodetector that measures the reflected light. A different head means a different type of fruit, or a different set of wavelengths. The same base can therefore be used with several heads, which can also be purchased later.
A measuring head (here the Kiwi head): the central hole is the sensor, the LEDs can be seen around it; the 4 screws at the corners fix it to the top panel.
Each head identifies itself to the instrument through three coding lines on the connector: for the standard heads (DA, Kiwi) the type is determined by how these lines are connected; the more recent heads instead contain a small memory (EEPROM) with all the necessary data: type, serial number, number of colours, wavelengths, current of each LED and correction coefficients. In both cases no setting is needed: the instrument recognises the head and adapts its operation (number of colours, displayed values, data files).
The type of the connected head and its parameters can be read in Menu → ABOUT (see Information and options) and are recorded at the beginning of every data file.
apples, pears, peaches, plums, apricots and other climacteric fruit
2: IR 720 nm (reference), Red 670 nm
yes
Kiwi
green- and yellow-fleshed kiwifruit
3: IR 750 nm (reference), Red 640 nm, Green 545 nm
yes
Kiwi blue
variant of the Kiwi head with a fourth colour
4: as Kiwi plus Cyan 500 nm
yes
Cherry
cherries
depend on the mounted head (they are stored in the EEPROM of the head)
depends on the head
Research
absorbance measurements at up to 6 wavelengths, for developing new protocols
from 2 to 6, defined in the EEPROM of the head
depends on the head
MultiPath
special head with a double optical path
2: Ref and Meas, both at 670 nm
yes
The first colour of each head (Ref or IR) is the reference, to which the others are compared to calculate the ΔA. For each measuring colour the instrument calculates a ΔA value, and if the head has more than one you can choose which one to display (see Settings, item Shown color).
Unscrew the 4 screws that fix the head to the top panel, lift off the head in use and fit the new one, then tighten the 4 screws again.
Switch the instrument on again. The message Head changed; Mean cleared appears.
Perform the calibration (CAL item): when the head is changed the previous calibration is cancelled.
When a head is replaced, the instrument clears the mean and invalidates the calibration. A head with EEPROM is also recognised by its serial number: even if you reconnect a head of the same type but a different one, the calibration must be repeated.
The sensor of the head must not be touched with the fingers or soiled. If necessary clean it with a soft, dry, lint-free cloth, or slightly dampened with water. When not in use, keep the head in its case.
First steps
This page summarises the sequence of a normal working day.
Connect the head suitable for the fruit to be measured (instrument off).
Connect the power supply and switch the instrument on with ON/OFF.
Check the date and time (Menu → Config → Date & time).
Perform the calibration with the white reference. It must be repeated at least once a day and whenever the head is changed.
If you work on lots, set the label and insert a marker (SET MARKER).
Place the head against the fruit and press OK, or switch on automatic measurement with F2.
resets the sample number to zero and clears the mean
SET MARKER
inserts a marker (and the label, if enabled) in the data
END BLOCK
closes the current block of measurements (with the label enabled)
ABOUT
information on instrument, head, software and options
Calibration
To work correctly the instrument must be zeroed with the white reference. Each head has its own calibration, valid until the end of the day on which it was performed: at switch-on, if the calibration is not from today, a warning appears and measurements stay blocked until a new calibration is made.
Press Menu and select CAL. The display shows White cal: Press OK for start.
Place the white reference on the head, as centred as possible and in contact with the sensor.
Press OK. The calibration lasts about half a second, with a continuous beep. Do not move the white reference.
If it succeeds, OK appears and the instrument returns to the menu. If calibration fail appears, the calibration did not succeed: check that the white reference is clean and well placed, that there is not too much ambient light and that the sensor is clean, and repeat.
With the storage function on, every calibration is recorded in the data with the values acquired for each colour, the temperature and the date and time.
Place the sensor of the head against the fruit and press OK. To obtain repeatable results you must measure on both sides of the fruit, in a centred position, and use the mean value: it is normal for the ΔA Index® on the two sides to differ significantly. On fruit with two distinct sides (such as the peach) the correct position is in the centre of each side; on regular fruit two opposite points are measured. How to choose the positions depends on the type of fruit and must be established in the measurement protocol.
The instrument takes the measurement by subtracting the ambient light from the light detected. Do not place the fruit in such a way that light enters between fruit and head.
The measurement: place the head against the fruit, in a centred position.
At the end, the ΔA value appears on the display. The possible warnings are:
NO LABEL!: the Label function is on but you have not yet inserted a marker; use SET MARKER.
calibration data too much old or absentees: calibrate the instrument.
Inconsistent data: the detected data are not consistent (head not in contact, unsuitable fruit, excessive light): repeat the measurement.
With the DA and Kiwi heads you can avoid pressing OK for every measurement. Press F2 to switch on automatic mode: the head continuously checks for the presence of an object and, when the head is placed against the fruit, the measurement starts by itself. This makes the analysis of large numbers of samples faster.
By pressing F2 again, or any other key, automatic mode is switched off. If the head does not provide autotrigger, the F2 key has no effect; this information can be seen in ABOUT (head with autostart functions).
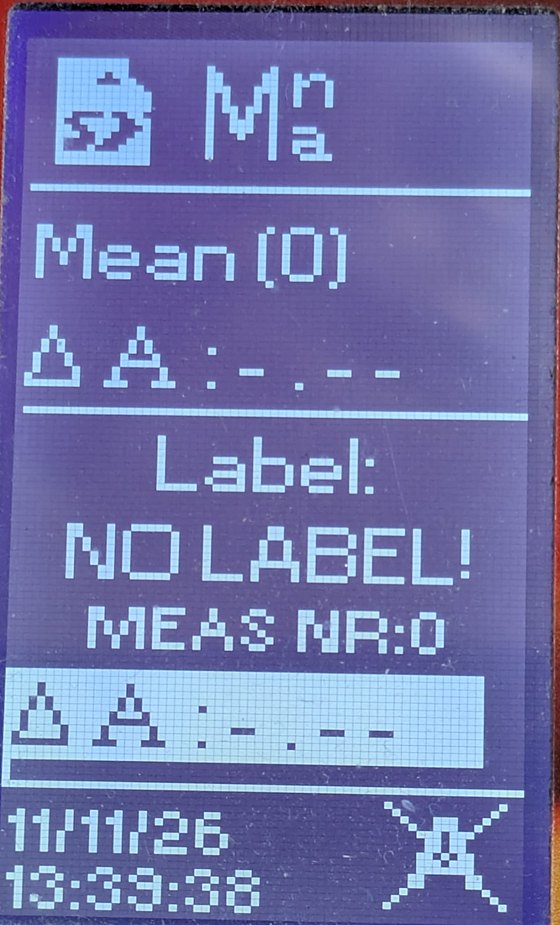
The screen shows the mean ΔA value (ΔA:) with the number of measurements on which it is calculated (Mean (n)) and, in the middle band, the identification of the last measurement:
with the Label enabled: the current label and the measurement number (MEAS NR);
with the Label disabled: the sample number (ID=) and the date and time of the last measurement.
The measurement screen (here without measurements: Mean (0), MEAS NR:0, values -.--). At the bottom left the date and time; at the bottom right the symbol of automatic measurement, crossed out when it is switched off.
ΔA measurements are normally between 0 (maximum detectable degree of ripeness) and 5 (extremely unripe fruit). Each variety has its own reference values, many of them available on the website www.dameter.com. Instrumental measurements do not replace experience: when the data do not agree with what is reasonable to expect, suspect a measurement error and check the calibration first.
With multi-colour heads (Kiwi, Cherry, research) the instrument calculates a ΔA value for each measuring colour, each one referred to the reference colour: the display shows the one chosen with Shown color, while all of them are recorded in the data.
Settings (Config menu)
The Menu → CONFIG menu collects the operating settings. Items that are not available are in grey.
It contains three items: Date format (DD/MM/YY or MM/DD/YY), Set time and Set date. Date and time are recorded in every stored datum: keep them correct.
It establishes how the displayed mean value is calculated:
Pairs: mean of the last two measurements, for protocols that provide two readings per fruit (one per side). Only one datum is stored for each pair, equal to the mean. The counter shown is that of the pairs.
Last 2: mean of the last two measurements; one record is stored for each reading.
Last n: mean of all the measurements made since the last clearing (MEAN CLR item); useful for analysing a whole lot.
It enables (ON) or disables (OFF) the recording of measurements in the internal memory of the instrument. It also contains Info, which shows the volume name and the free space, and Format, which deletes all the data from the internal memory.
The label is a code of up to 10 characters that identifies a lot or a field of measurements. The Label menu contains Label enabled/disabled (enables the function), History ena./dis. (lets you choose the label among the last 6 used) and Format (type of the individual characters: numeric, alphabetic, alphanumeric, blank, hyphen, with or without auto-increment).
When you insert a marker with the Label enabled, the instrument proposes the next label: the fixed characters stay unchanged, the auto-incrementing ones increase by one unit, and you can modify them anyway. For example, with the format A A N N - N+ N+ N+ you get MR32-000, MR32-001, …, MR32-045. The label is written in the data together with the marker and identifies all the measurements that follow it, up to END BLOCK.
Available if the Ethernet option is enabled on the instrument. See Network connection.
Network connection
The MultiMeter can be connected to the laboratory network with an Ethernet cable. The network functions are options of the instrument: in ABOUT you can see which ones are enabled (ETHERNET, FTP, TFTP, HTTP).
Connect a network cable to the RJ45 socket (10/100 Mbit/s). Then open Menu → Config → Network → Ethernet, which contains:
Mode: Use DHCP (the address is assigned automatically by the network, recommended choice) or Manual;
IP, Gateway, Netmask: address, gateway and network mask; they can be changed only in Manual mode. To set them, ask your network administrator.
The Network → Info item shows the state of the connection: DHCP mode, Connected/Unconnected and the assigned IP address. Make a note of it: you need it to connect to the instrument from the PC.
With the network active, the instrument offers — according to the enabled options — these services:
Service
Use
Web pages (HTTP, port 80)
They are opened with a browser at the IP address of the instrument, for example http://192.168.1.61. They show the information on the head, allow you to take a measurement, to change some settings and to browse, view, download and delete the stored files (see The instrument's web pages).
FTP
It allows an FTP program (or File Explorer) to read the stored files. The instrument does not ask for a password.
Remote measurement (TCP, port 12345)
A program on the PC sends the READ command and the instrument takes a measurement and replies with the result, for example NR:5 , L: 0000000001, DA0=1.04,DA1=0.00,DA2=0.00. If the measurement is not possible the reply starts with Warning:.
With the HTTP option enabled, just type the IP address of the instrument (you find it in Network → Info) in the address bar of a browser on a computer, tablet or phone connected to the same network, for example http://192.168.1.61. The DA Meter Web Interface opens, with a menu on the left with four items. The texts of the pages are partly in English and partly in Italian.
It presents the available functions and, under Head Information, the data of the connected head: type (Head Type), serial number (if the head has the EEPROM), presence of autotrigger (Autostart), number of colours and, for each colour, wavelength in nm, LED current in mA, coefficient and name. These are the same data that can be read in ABOUT on the display. For example, for the Kiwi head: IR 750 nm (reference, 60 mA), Red 640 nm (100 mA), Green 545 nm (120 mA).
It lets you take a measurement from the computer. Press Esegui Azione («Run action»): it is like pressing OK on the instrument, with the head placed against the fruit. The result appears as large displays, one for each ΔA value (DA0, DA1, …, in the order of the measuring colours of the head), and is added to the Storico misure («Measurement history») table, which scrolls and lists the measurements taken from the page.
The same rules apply as for measuring on the instrument: if today's calibration is missing, if the Label is on and there is no marker, or if the data are not consistent, --- appears instead of the values, with the warning message (for example Warning: calibration data too much old or absentees.). Before using the page, therefore, perform the calibration on the instrument.
It shows, and lets you change from the computer, some settings of the instrument:
Data (date) and Ora (time): the instrument proposes them with the current values;
Tipo di Media (mean type): Pairs, Last 2 or Last n (see Settings);
Negative value: Show or Clamp to 0;
Colore visualizzato (displayed colour): the list of the measuring colours of the connected head.
The changes are applied by pressing Salva Impostazioni («Save settings»); the message Impostazioni salvate con successo! («Settings saved successfully!») appears. The settings on the pages correspond to the items of the same name in the Config menu. The changes made from the web become active the next time the instrument is restarted: switch it off and on again to see them applied.
It lists the data files present in the internal memory with their size in bytes, and at the bottom of the page the free space in KB. For each file:
clicking on the name downloads the file to the computer;
View opens the content of the file in a new browser tab;
Elimina («Delete») deletes the file from the instrument, after a confirmation request. Deletion is permanent: download the file before deleting it.
The files have a name like AD231114.TXT: the letters AD followed by the date in the format YYMMDD (here, 14 November 2023); they contain the measurements of that day.
Transferring data
The measurements are recorded in the internal memory of the instrument (if Store is ON), in a text file for each working day, named ADYYMMDD.TXT (for example AD231114.TXT for 14 November 2023). To bring them to the PC you have three options.
If the network options are enabled, the files can be downloaded from the instrument's web pages (File Browser item, see The instrument's web pages) or with an FTP client. The downloaded files are in the instrument's original format, not in CSV.
Some functions (Ethernet network, FTP, web pages and others) are options that are enabled on the instrument. New options can also be purchased after the purchase: contact Sintéleia, giving the serial number of the instrument, to obtain the enabling file.
Maintenance
The MultiMeter is a measuring instrument: treat it with care and avoid knocks and stress.
Clean the case with a soft, dry cloth, with the instrument switched off and the power supply disconnected. Do not use solvents.
Do not let liquids get into the instrument or into the heads. If this happens, disconnect the power supply immediately and contact the distributor.
Keep the sensor of the head clean (see Measuring heads) and the white reference, which must be kept away from dust and fingerprints.
Change the head and connect or disconnect the power supply only with the instrument switched off.
Do not open the instrument: it contains no parts that can be repaired by the user. The clock battery must be replaced by the service centre.
up to 6, between the visible and the near infrared, depending on the head
LED current
selectable for each colour: 20, 30, 40, 60, 80, 100 or 120 mA
Acquisition time
500 ms
Display
128 × 64 dot graphic LCD with backlight
Keypad
membrane, with navigation keys, OK, Menu, F2 and ON/OFF
Data memory
16 MB internal flash memory; export to USB stick (FAT32)
Connectivity
Ethernet 10/100 Mbit/s; USB for memory stick
Network protocols
HTTP, FTP, TFTP, remote measurement over TCP (port 12345)
Temperature sensor
internal; the temperature is recorded with every measurement
Clock
RTC with backup battery
Weight
approx. 400 g
Environmental operating conditions
temperature from 5 to 40 °C; relative humidity from 20 to 80 %, non-condensing
Manufacturer
Sintéleia S.r.l., via di Corticella 35, 40129 Bologna — www.dameter.com
Warranty conditions
LIMITED WARRANTY AND LIMITATION OF LIABILITY
All ΔA Meter® instruments, under normal conditions of use and service, are warranted to be free from defects in materials and workmanship, unless otherwise stated. The warranty period of the main unit is two years from the date of purchase. Parts, accessories and repairs of the products are warranted for a period of 90 days, unless otherwise specified. Cables, the power supply, storage media and other peripherals are considered parts or accessories. The warranty extends only to the original Purchaser or to the end customer of an authorised Sintéleia reseller and does not apply to products that, in Sintéleia's discretion, have been misused or accidentally damaged by causes related to use in poor conditions or incorrect use. Sintéleia warrants that the software has been properly recorded on non-defective media and warrants its operation for 90 days in accordance with the relevant technical specifications. Sintéleia does not warrant that the software will be free of error messages or that it will operate without interruption.
Authorised Sintéleia resellers will extend this warranty to new and never-used products only to end customers, but cannot grant on behalf of Sintéleia different or broader warranties. The warranty is valid only if the product is purchased from authorised Sintéleia resellers or if the Purchaser has paid the applicable international price. Within the limits permitted by law, Sintéleia reserves the right to invoice the Purchaser for the cost of repair or replacement when a product purchased in one country is sent to another country for repair.
Sintéleia's warranty obligation is limited, at Sintéleia's discretion, to a refund of the purchase price, free repair or replacement of a defective product that is returned to a Sintéleia service centre within the warranty period.
To obtain warranty service, contact the nearest Sintéleia reseller, who will collect the instrument for repair. Sintéleia accepts no liability for damage occurring during transport. After warranty repair, the product will be returned to the Purchaser with prepaid shipping costs (FOB destination). If Sintéleia determines that the defect was caused by misuse, alteration of the product, accident or incorrect operating or maintenance conditions, it will provide the customer with an estimate of the repair costs with a request for authorisation to proceed with the work. After repair, the product will be returned to the Purchaser with prepaid shipping costs and the Purchaser will receive the invoice for the repair and for the return shipping costs (FOB point of shipment).
THIS WARRANTY IS THE PURCHASER'S SOLE AND EXCLUSIVE REMEDY AND IS IN LIEU OF ANY OTHER WARRANTY, EXPRESS OR IMPLIED, INCLUDING, AMONG OTHERS, THE WARRANTY OF MERCHANTABILITY OR FITNESS FOR A PARTICULAR PURPOSE. SINTELEIA SHALL NOT BE LIABLE FOR ANY SPECIAL, INDIRECT, INCIDENTAL OR CONSEQUENTIAL DAMAGE OR LOSS, INCLUDING LOSS OF DATA, ARISING FROM ANY CAUSE OR THEORY.
Because some countries do not allow the limitation of the duration of an implied warranty, or the exclusion or limitation of indirect or consequential damages, the limitations and exclusions of this warranty may not be valid for all purchasers. If any of the provisions of this Warranty is held invalid by a court or other competent authority, such a ruling will not affect the validity or enforceability of the other provisions.